 Save to Pinterest
 I'll never forget the first time I arranged a Pride board for my best friend's celebration party. I'd spent weeks thinking about how to make something visually stunning that honored the moment, and when I finally lined up those colors in perfect rainbow curves, watching my friends' faces light up made me realize this wasn't just appetizers—it was art you could eat. That day taught me that food has this incredible power to express joy and community all at once.
The moment that really stuck with me was when I brought this to a Pride event and a young person came up to me afterward and said seeing those colors arranged so carefully made them feel seen and celebrated. That's when I understood why this board matters—it's not just beautiful, it's a statement of love and acceptance on a plate.
Ingredients
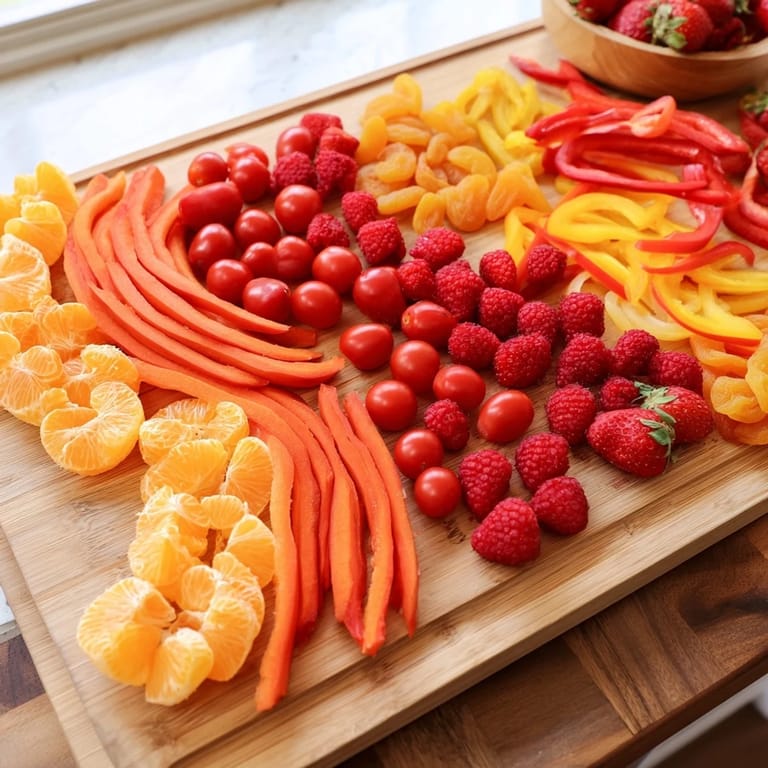
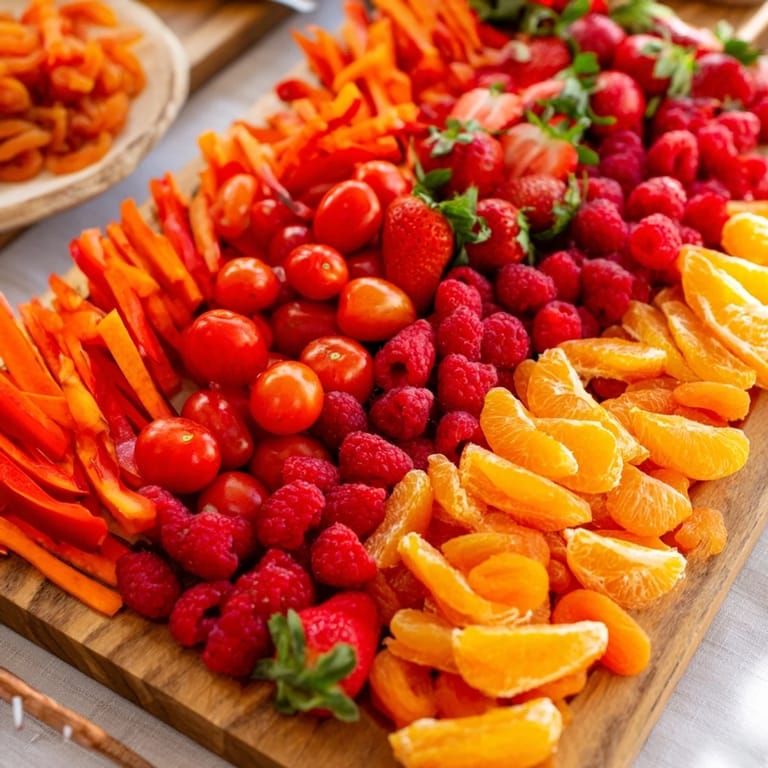
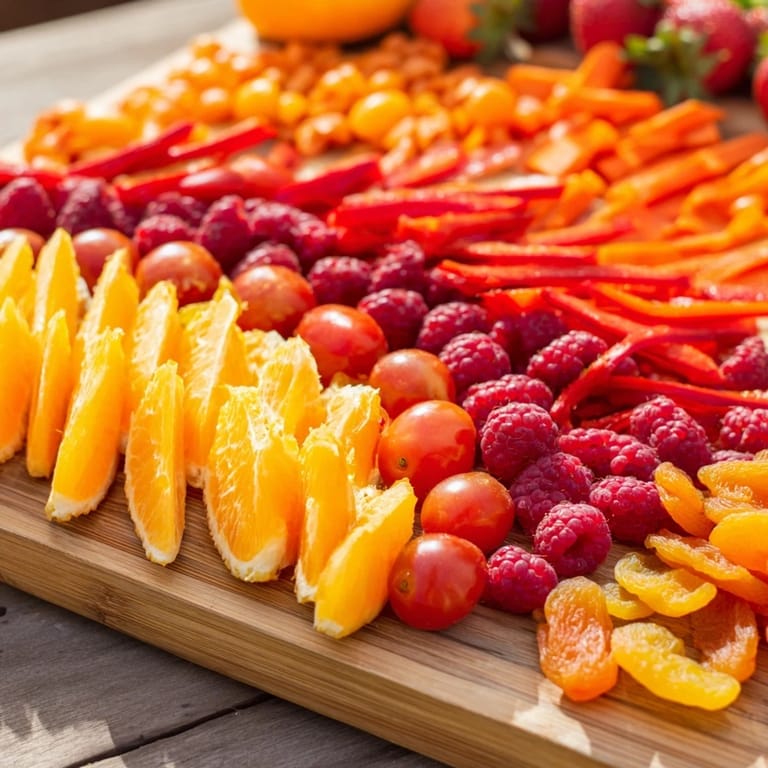
- Cherry tomatoes and strawberries: These are your red anchors, and I've learned that halving them instead of leaving whole helps them nestle into curves without rolling everywhere
- Red bell pepper strips: Cut them into long, elegant strips that follow your color line—this creates flow and makes the board feel intentional
- Raspberries: These jewel-toned berries add texture and a delicate sweetness that rounds out the red section
- Orange bell pepper and mandarin segments: The brightness here is unmatched, and the citrus adds a pop of natural sweetness that keeps people reaching back
- Dried apricots: A secret weapon for color consistency—they stay vibrant and add a chewy element that surprises people
- Baby carrots: Choose the smallest ones you can find so they look refined and fit naturally into the curve
- Pineapple and yellow bell peppers: These keep the yellow section bold and stop it from looking washed out
- Yellow cherry tomatoes: Hunt for these specifically—they bridge the gap between fruit and vegetable beautifully
- Cheddar cheese cubes: Cut them generous so they're visible and add a creamy contrast to the bright yellows
- Green grapes and cucumber: I always use seedless grapes and slice cucumbers on the bias—it just looks more intentional
- Sugar snap peas: Leave these whole and arrange them standing up for height and visual interest
- Guacamole: Make this fresh right before serving and keep it in a separate small bowl to prevent browning
- Blueberries and blue corn tortilla chips: The chips are essential because pure blue food is rare—they add both color and crunch
- Blackberries: Use these twice, in both the blue and purple sections, to create a subtle color bridge
- Blue cheese crumbles: Don't skip this even if people are skeptical—the tangy flavor makes the blue section memorable
- Purple grapes and purple cauliflower: The cauliflower florets add sophistication and a grounding earthiness
- Dried figs: Halving these reveals their beautiful interior and adds a luxurious touch to the finale
- Gluten-free crackers and hummus: These are your supporting cast—choose crackers with neutral flavors so they don't compete with the colors
Tired of Takeout? 🥡
Get 10 meals you can make faster than delivery arrives. Seriously.
One email. No spam. Unsubscribe anytime.
Instructions
- Gather and prep everything:
- Before you even touch the board, wash all your produce and lay it out by color on your cutting board. Slice, halve, and chop everything while you're thinking clearly—trying to prep while arranging is where things fall apart. You'll feel so much more in control once everything is ready to go.
- Choose your board with intention:
- A large rectangular or oval board works best because it lets you create those flowing curves naturally. If you use a round board, it fights against the linear rainbow feeling. Trust me on this—I learned it the hard way at my first attempt.
- Map out your color lines:
- Start at one end with red and lightly imagine where each color section will flow. Don't just dump everything in random—take a breath and picture those gentle curves before you place a single ingredient. This mental mapping takes 30 seconds and changes everything.
- Begin with red, moving deliberately:
- Place your cherry tomatoes and strawberries first in a loose curve, then add the bell peppers and raspberries. Leave a little space between elements—this isn't about covering every inch, it's about intentional placement. The gaps make the colors pop.
- Progress through orange, yellow, and green:
- Use the same approach for each section, letting each color transition naturally into the next. Step back frequently and look at the whole board. You'll notice when something feels off before your brain can explain why.
- Complete the blue and purple finale:
- Save the deeper, more complex colors for last because they anchor everything beautifully. The blueberries and blackberries ground the whole arrangement and make people understand what they're looking at.
- Fill gaps and add abundance:
- Once your rainbow is clearly visible, add extra elements wherever there are gaps. This is where the board goes from nice to abundant and celebratory. Use those crackers to fill empty spaces and let things feel generous.
- Place dips strategically:
- Nestle the hummus and guacamole bowls near their matching colors—hummus near greens, guacamole in the green section. This creates a visual logic that feels intentional.
- Step back and breathe:
- Before serving, take a moment to look at what you've created. You've just made something beautiful that celebrates joy and community. That moment of recognition matters more than you might think.
 Save to Pinterest
 I remember watching a shy teenager at a Pride event slowly walk around my board, taking in each color carefully, and then turning to their parent with this small smile that said everything. They told me later it was the first time they felt safe in a space that celebrated who they were. That's when I realized this simple arrangement of fruits and vegetables was actually so much more—it was a symbol of belonging.
Making This Board Your Own
The beauty of this board is how personal you can make it while keeping the rainbow structure intact. I've learned that substitutions don't weaken the concept—they strengthen it by making it yours. Use whatever produce is freshest at your market, whatever makes you happy. One year I added edible flowers in each color section and it became even more magical. Another time I swapped the blue chips for blue potato slices and people were delighted by the unexpected choice. The structure holds everything together, so the details become your signature.
The Meaning Behind the Spectrum
Every time I make this board, I think about what each color represents—red for life and passion, orange for healing, yellow for sunlight and hope, green for nature and growth, blue for harmony and serenity, purple for spirit and imagination. Arranging them in order becomes this quiet act of intention. It's not about religion or politics; it's about making a physical space where all those colors belong together, not separated. That simple act of bringing them together feels revolutionary in the best way.
Timing and Serving for Maximum Impact
I've learned that this board reaches its peak about 15 minutes after you finish arranging it. The edges get a little dewy, the colors seem even more saturated, and people have usually gathered around with their phones ready. Set this out right before your event starts and watch how quickly it becomes the focal point. Pair it with sparkling water for a refreshing contrast, or a crisp white wine and dry rosé if your crowd leans that way. The key is letting the board be the star—it doesn't need competition.
- Prep everything 2 hours ahead but don't arrange until 30 minutes before serving to keep everything fresh and vibrant
- Keep a small damp kitchen towel nearby to wipe any condensation off your board—it keeps the colors from looking dim
- If making this for a longer event, have backup strawberries and berries ready to refresh the board if any sections start looking tired
 Save to Pinterest
 This board is more than just an appetizer—it's a celebration on a plate. Every time you make it, you're creating a space where colors belong together, where joy is visible, and where everyone knows they're welcome. That's beautiful work.
Recipe FAQs
- → How should ingredients be arranged on the board?
Arrange each ingredient in distinct curving lines by color, starting from red and progressing through orange, yellow, green, blue, and purple to create a striking visual.
- → Can I customize ingredients for dietary needs?
Yes, omit cheeses for a vegan option or substitute with plant-based alternatives. Seasonal fruits and vegetables can be used while maintaining color separation.
- → What accompaniments work well with this board?
Include gluten-free crackers and dips such as hummus or guacamole to complement the fresh ingredients and add texture.
- → How do I maintain the vibrant colors?
Use fresh and ripe produce, wash and slice carefully, and arrange promptly to keep colors vivid and prevent mixing.
- → What beverages pair best with this arrangement?
Light beverages like sparkling water, crisp white wine, or a dry rosé pair well with the fresh and varied flavors of the board.
- → Are there any allergen considerations?
Be aware of dairy in cheeses and potential allergens in crackers. Check labels carefully and offer substitutions as needed.